Shissler Recreation Center
Preschool Ceramics Class
Teachers: Sarah Gregory and Ellen Scolnic
ASI Spring 2016
Time: Thursdays, 9am-11am
Dates: January 28-April 14 2016.
Students: 21
Lesson
Reinforce the shape/color curriculum being covered at the preschool sites. Students will learn to identify shapes, colors, fruits, and vegetables, create pattern, develop fine motor skills through working with clay, and practice expressing ideas. Students will practice expressing their ideas, talking to peers, and working together. In each lesson students will practice following directions and respecting self/others.
For all of these lessons we plan to follow site teacher’s classroom management strategies.
Theme: Art and Food
Ideas to Incorporate
– healthy eating
– shape and color identification
– experiential learning with clay
– using stamping techniques to create patterns
Clay Lessons:
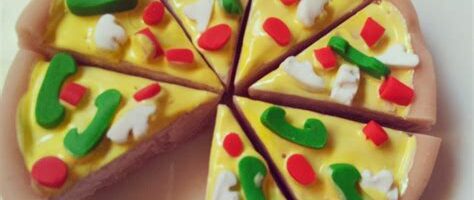
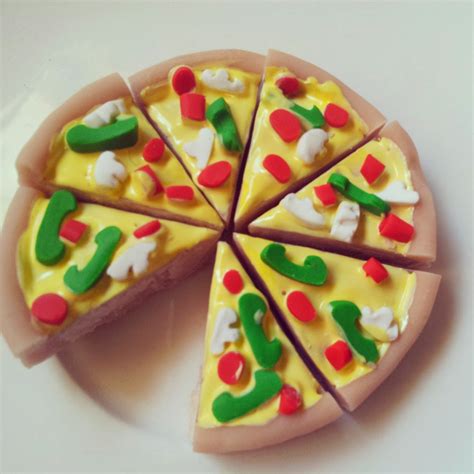
1)Making Clay Pizza Slices
(Identifying/Creating Shapes, fine motor skills, applying knowledge to new situations, Community/collaboration)
Materials
Clay
Directions
1. Practicing identifying shapes and colors.
2. Create Triangles for the body of slice, different shapes for toppings, cylinder for crust.
3. Discuss the steps it takes to make a pizza.
4. Discuss healthy options for pizzas (more vegetables, etc.).
5. Demonstrate how the pizza slices can come together to make a whole pie.
2) Square tile wall hanging with fruit and vegetable imprints
(Shape and Texture/Pattern; Creating/responding to texture, fine motor skills)
Materials
Clay
Stamps made from food
Directions
Create Texture:
1. Discussed properties of a square
2. Ask students for examples of squares that can be found in real life.
3. Teach students to create square tile.
4. Introduce the word texture- ask students to think of different examples
(what is something that is soft? Something scratchy? Something smooth?)
5. Create texture using stamps created from food (dried beans, rice, lentils, etc).
Respond to texture:
1. Introduce students to ways they can respond to texture, by rubbing crayons on paper over texture.
2. Use collographic texture plates with famous artworks on them.
3. Have students rub crayons on paper on top of plates to reveal image.
4. Explore different effects of using different coloring materials and different mark making strategies.
3)Model Magic Flowers
(Color mixing, gift-making, fine motor skills)
Materials
Model Magic
Plastic forks
Directions
1. As a class discuss the seasons and characteristics of spring.
2. Discuss what makes flowers grow (sun, water, air)
3. Explore color mixing with Model Magic.
4. Teach students different ways to manipulate clay to create flowers.
If they find their own method that’s okay too!
5. Prompt students to consider giving their creation to someone as a gift.
4) Textured Pinch Pots & Stamp Painting
(fine motor skills, form, functional artwork, texture, pattern, Same tool in different materials = different results)
Materials
Clay
Stamps made from food
Lace
Directions
Pinch Pots:
1. Discuss what objects help you eat (silverware, plates, bowls, etc)
2. Explain people made these objects (each has a history!)
3. Introduce pinch pots.
4. Teach students to manipulate clay.
5. Discuss texture from last week.
6. Use stamps made from dried foods and lace to add texture to bowls.
Stamp Painting:
1. Ask students to consider what kind of marks the stamps might make in paint instead of clay.
2. Have students use the stamps in tempera paint to create their own brightly colored, abstract pattern paintings.
3. Ask individual students to talk about their paintings.
4. Each had a unique vision for what their painting was about- even though it was abstract.
5) Healthy Clay Tacos and Collage
(food, shape, texture, social connections, fine motor skills)
Materials
Clay
Stamps made from food
Collage-Markers
Crayons
Mixed papers
Glue sticks
Directions
Part 1- Tacos
1. After asking students about their favorite foods we investigated a frequently cited favorite- tacos.
2. Ask students what healthy things could go in a taco- they suggested many different vegetables and cheeses.
3. Apply the clay manipulation skills they practiced in earlier lessons, teach students how to create a taco shell form, stamp inside with texture, create vegetable toppings, and fold in half.
4. Have students talk to each other about their creations.
Part 2- Collage
1. Discuss how different ingredients come together to make a delicious dish.
2. Introduce collage.
3. Ask students to collage their own dish, or if they have another idea they want to explore to create a collage about it.
4. Have students tear paper, arrange pieces, and glue them to construction paper.
5. Ask students about what they are making, encourage sharing with peers.
6) Glazing first two projects & Part 1 of Coffee Filter Butterflies
(Color mixing, fine motor skills, properties of materials (glazes, clay, water soluble markers), communication, following directions)
Directions
Part 1: Glazing
1. Begin with discussion- asking students what projects they made first, what the clay had felt like then.
2. Hand out projects- ask students to make observations about what it feels like now (hard!).
3. Point to different colors, ask students what foods/objects they could think of that were those colors.
4. Introduce directions for glazing.
Following directions was important for this process- students were asked to be careful handling their pieces, not to get paint on their neighbor, not to contaminate shared glaze cups by keeping brushes for different colors separate. Glaze mixing could take place on individual cups.
5. Have students glaze pieces and mix colors as needed.
6. Make suggestions but allow students to make their own decisions glazing.
7. Stimulate thought by asking students why they are painting something a particular color, provoke explanation.
Part 2: Coffee filter butterflies
1. Discuss creatures that come out in spring, bring up the flowers from previous lesson; discuss creatures that work together with flowers (symbiosis)- butterflies.
2. Have students draw on coffee filters using magic markers- the subject could be based on our discussion or not.
3. Use a squirt bottle to spray coffee filters- show students how the colors bled and mixed.
4. Discuss how the color mixing was similar to what they had seen in model magic and tempera paint, and how it looked different.
5. Set aside to dry and finish next week.
7) Painting with Straws-Sakura Ink Painting Japanese Cherry Blossom Trees-watercolor; Crayon Resist Painting;
Part 2 Coffee Filter Butterflies
(Cultural lessons, Painting Techniques, Spring/Seasons, Animals)
Materials
Watercolors
Straws
Crayons
Directions
Part 1: Sakura Ink Painting
Continuing the spring theme of the site’s preschool lessons-
Sakura Ink Paintings of Japanese Cherry Blossom Trees:
1. Discuss how Japan gave the US the trees as a gift, a sign of peace, and how there is a Cherry Blossom Festival every year.
2. Show images of the traditional paintings.
3. Demonstrate how to paint the tree trunk and branches using a brush- then create pools of the red/pink paint and use a straw to blow the ink pools to create sprawling marks that evoke flowers.
4. Have students create their own backgrounds and add any details they wanted.
Part 2: Crayon Resist Painting
Materials
Watercolors
Crayons
Heavy paper
Directions
1. Give students a separate paper and crayons.
2. Ask to draw an image-it could be based on the trees we had painted or on their own ideas.
3. Ask students what they expected to happen if we were to paint on top.
4. Explain that wax is resistant to water.
5. Have students explore painting with water colors on their drawings.
Part 3: Coffee Filter Butterflies
Materials
Coffee filters
Markers
Pipe cleaners
Directions
1. Bring in the dry filters the students drawn a week prior.
2. Ask the students how it looked different than when originally created.
3. Pass out coffee filters and demonstrate how to fold pipe cleaners around them to create butterflies, twisting the ends to become antenna.
We talked about how some butterflies migrate and then went to practice our own migration.
4. Bring the students to a large space where they can practice flying as individuals and as a group with the butterflies.
5. End the class by sitting on the floor, leading the students in taking several deep breaths to calm us from our journey.
8) Finishing Glazing Ceramic Pieces and Hiro Sakaguchi lesson
(following directions, color mixing; Home vs. outside world, taking home with you)
Materials
Glazes
Brushes
Part 1: Glazing
Directions
1. Students will finish glazing remaining ceramic pieces.
Part 2: Hiro Sakaguchi- home vs. outside world
Materials
Images of Hiro Sakaguchi’s work
Paper
Crayons
Watercolors
Directions
1. Use an iPad to show students the work of Hiro Sakaguchi a contemporary Philadelphia artist who grew up in Japan.
2. Discuss how Sakaguchi’s work is based on his experiences growing up in Japan, and living in the United States.
3. Ask students to look at the artwork and identify any objects they recognize (he frequently uses teddy bears, legos, etc)
4. Students will be given a sheet of paper and asked to draw their favorite object(s) from home using crayons, then use watercolors to paint it in their favorite place outside.
5. Discuss how when you miss home, you can use your imagination to take home with you everywhere you go.
9) The Lion and the Mouse
(Helping others, compassion, bookmaking, technology)
Materials
Tablet/projector
Paper
Crayons
Directions
1. Have students make a paper book.
2. Show students video of the Lion and the Mouse Story.
3. Have them draw to go along with each scene, or to create their own version of the story.
4. Play Aesop’s fables CD (by Richard Maltz) while students work to help stimulate ideas and create a relaxing environment.
5. Students will be asked about their work and to share with classmates at the end if they are comfortable.
6. If there is time students may get into groups and act out their story.
**During class- one teacher will interview each student to complete an artist statement.
10) Artist Statements and Art Show
(finishing ideas, expressing ideas, sharing ideas with others)
Directions
1. Students will finish up books from last week, adding more drawings and elaborating.
2. Artwork will be arranged on tables, and parents will be invited to come see their children’s creations.
3. Students will be prompted to look at each other’s work and talk about what they have learned and what they want to make in the future.
4. Students will be given recipes for homemade clay and a link to the Creating Legacies Through Art, that they can take home to continue making art at home.