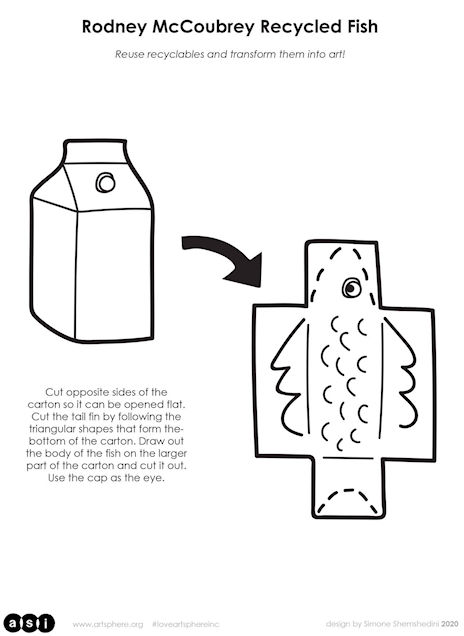
Rodney McCoubrey Inspired Recycled Fish
Your Destination: (objectives)
- The goal of this lesson is for the students to learn about recycling through art! Even though it is not the most traditional way to recycle, it can be really fun and a good way to reuse objects that would otherwise be thrown away.
Travel kit: (materials)
- Some sort of milk carton (plastic or card board), recycled paper (magazine or newspaper), one lid of a jar, acrylic paint or gouache, paint brush, plastic bag.
On the path
Step 1
- Take your carton and open it up. Pick two of the sides and cut them so that the carton is now flat. From here you can make the tail fin by following the shapes from the bottom of the carton and cutting the end triangle out. Take a marker and draw out the body of the fish on the main part of the carton and cut it out. If the carton is made of plastic you might want to ask a parent or older sibling for some help.
Step 2
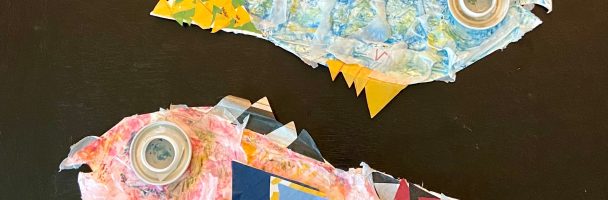
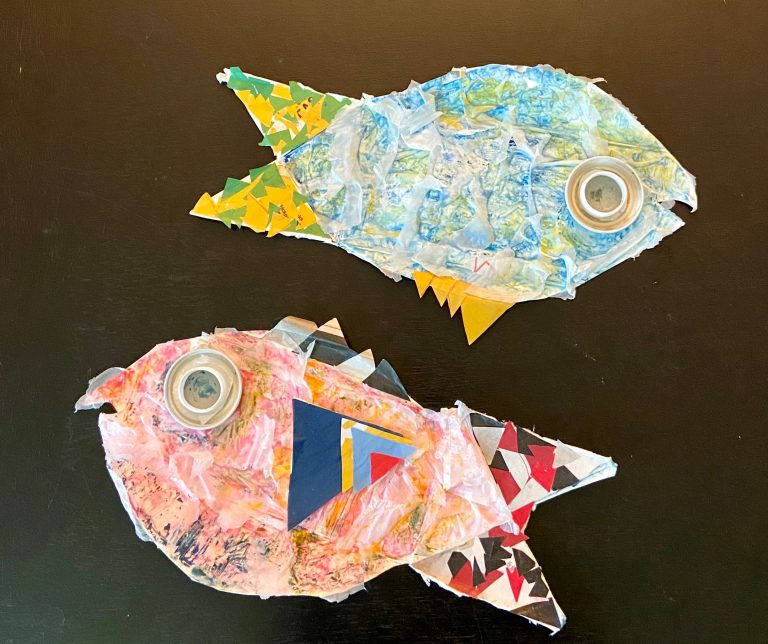
- Choose one color that you want to paint your fish. Paint everything except the tail fin and then let this dry.
Step 3
- Move on to the top fin and tail fin! Cut different size triangles out of your magazine. Feel free to choose a bunch of different colors. Lay the triangles out at the top of your fish, I like to line them up from large to small, but mix it up if you’re feeling that! Glue the triangles down. For the tail fin these triangles can be any size you would like! Here you are going to overlap the triangles so that the tail part of the carton is completely covered. Don’t worry if the triangles don’t fit completely and stick out from the fish tail! Let these fins dry before moving on to step 4.
Step 4
- Move back to the body it’s time to glue the eye! For this step you are going to use your jar lid and the spicket that is attached to your milk carton. Fist glue the lid where ever you want the eye, and then glue the spicket into the lid. Let these dry.
Step 5
- Now we are going to make the scales for the body of the fish. Cut out pieces from your plastic bag, these can be all shapes and sizes. Put a light layer of glue where you want your scales and then attach your plastic pieces. Let this dry. Once your scales are dry you can add more paint on top of them to add some other colors!
Step 6
- Last step! Once your fish is completely dry, we can make the lower fin. This fin can be placed in the middle of the fish or on the bottom of your fish. Now you are going to pretty much repeat the steps for making your top fin. Cut out different sized triangles and lay them out from large to small. Once you’re happy with your placement you can glue them down. Now your fish is complete!
Group tour:
- Make a diverse class ocean where everyone student creates a fish.
Extend your journey:
- Talk about why it’s important to reuse materials. Dive deeper into global climate change and how it is impacting our world.
Learn new vocabulary
- Recycle, reuse, contemporary artist.