Your Destination: Learn about the American Robin and its nest. Then create your own Robin’s nest using simple materials around the house.
Travel Kit:
- 2-3 pieces of paper
- pencil
- brown paper
- glue
- blue markers, crayons or colored pencils
On the Path: Learn about the American Robin
Step #1: Learn about bird eggs and the American Robin’s eggs. Begin this lesson by asking these questions: What is an egg and why are eggs different colors and sizes? Birds are oviparous, that means they produce their young by eggs which the mom has laid and will hatch on their own.
Look at an image of the Robin’s egg. They are famous for their beautiful blue eggs. Their eggs are so stunning that there is a shade of blue called Robin’s Egg Blue.
Step #2: Look at images of the American Robin. Identify its main physical traits: grey cover feathers, orange down feathers, dark-grey flight feathers and tail feathers, dark eyes and a bright yellow beak.
Step #3: Robins are omnivores which means they eat pant and animal based foods like berries and insects.
Step #4: Discuss what Robin’s use to make their nests. Robin’s nests are bowl shape and have to last for months and months to hold their eggs and the baby birds that hatch from them. Their nests are made of mud, twigs and dried grass. They build their nests just to hold their eggs in a safe space. Their nests provide shelter and safety for their eggs. When the eggs hatch the baby birds have a safe place to grow up before they learn to fly and can leave the nest.
On the Path Part 2: Make Your Own Robin’s Nest
Step #1: Let’s start by drawing our Robin’s eggs. Eggs come in all different colors and sizes but they’re all a similar shape, an oval. Eggs have this tapered shape (smaller, narrowed on one side) to help them fit together tightly in their nest.
Step #2: You can draw an egg using a circle. Get the first piece of paper and a pencil. Draw a circle, then draw two curved lines, in the shape of a ‘u’ or ‘c’ on either side of the circle. Erase the circle inside the oval. Practice drawing ovals until your paper is completely filled.
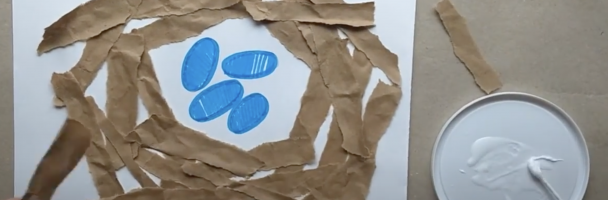
Step #3: On your second sheet of paper draw 4 eggs. Find the center of your paper and draw 4 ovals close together about the size of your thumb. Color these ovals in with a blue marker, crayon or colored pencil.
Step #4: Let’s build the nest. Using a brown paper bag rip strips of paper at varying sizes about the length of your fingers. These will be the twigs that Robin’s use in their nests. Glue these pieces of paper around your eggs forming a circle.
Extend the Journey
Learn New Vocabulary:
Bird Eggs: Laid by the female bird and are incubated by the bird until the baby bird is ready to hatch from the egg.
Oviparous: Birds create their young by laying eggs.
Robin’s Egg Blue: a shade of blue that is based on the color of Robin’s eggs.
Cover Feathers: feathers that are all over the bird’s body.
Down Feathers: feathers that help control the bird’s body temperature.
Flight Feathers: feathers on the bird’s wings.
Tail Feathers: feathers on the bird’s tails.
Beak: like a mouth, bird’s use their beaks for eating.
Omnivores: birds that eat plant and animal based foods.
Nest: a place that an animal can store their eggs safely, made from natural materials, like twigs and mud.
Oval: a curved shape that looks like an egg.